Showing posts with label cookies. Show all posts

Saturday, June 6, 2015

Spicy Mangodoodles


Part of my job is consistently keeping up with food trends. Of course, doing that covers a gamut of areas, one of which is "Packaged Foods". Because some of my work is styling for packages, I'm always browsing the shelves of the stores I visit to see the big brand names, as well as the small local products, are doing.

Though I'm usually a "bake from scratch" kind of gal, I like to pick up new flavors of mixes to try and see if I can tweak them a bit. I found this cookie mix the other day while scanning the shelves and was intrigued by the flavor - "Mango". Always a fan of the fresh mango, I thought I would give the mix a try. One of our favorite ways to eat fresh mango and pineapple here at home is to sprinkle the spicy taste of Trechas all over it. I also love "Snickerdoodles" so that pretty much sums up how I came up with this easy recipe. Give it a try, or if you find the mix and try something different, let me know in the comments below. I'm thinking of putting a scoop of mango sorbet in the middle of two of these cookies for a yummy summer ice cream sandwich. Sounds good, right?


Spicy Mangodoodles

1 Box of Pillsbury Mango Cookie Mix
1/2 Cup softened butter
1 Egg

Trechas Spicy Powder (Usually found in the produce section or Latin aisle of grocer)

Make Cookies per instructions on back by mixing the soft butter, egg and cookie mix until a soft dough forms. Roll in balls and then dip tops in Trechas powder. Bake at 350 for 7-8 minutes. The powder can burn quickly so keep an eye on your cookies depending on what size you make. I used 1 and 1/2 tsp of dough per cookie.


Tuesday, March 31, 2015

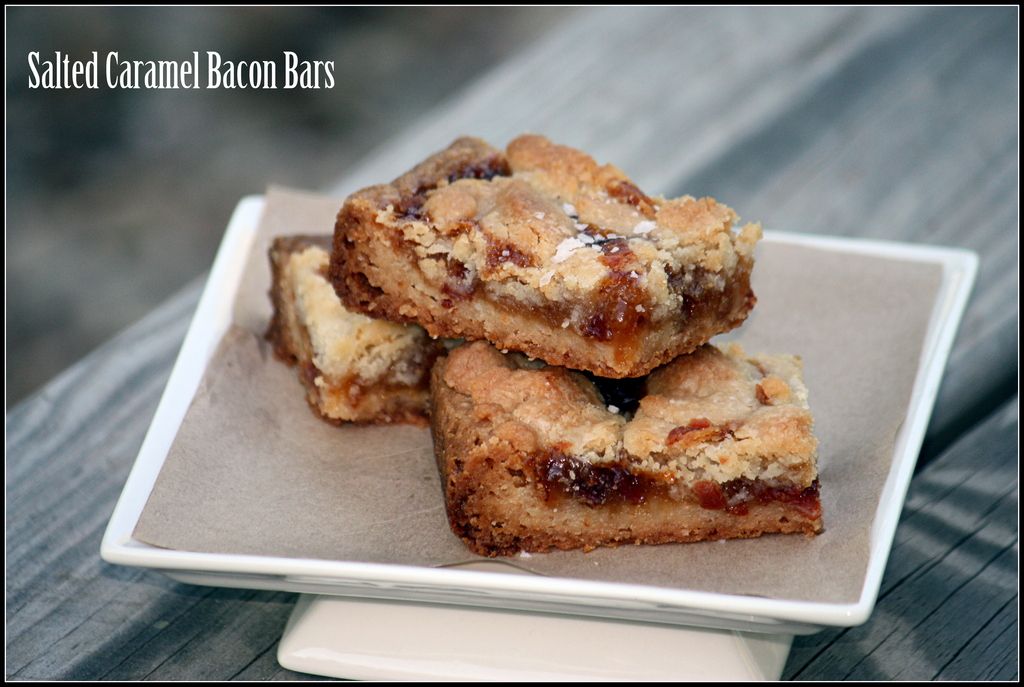
Salted Caramel Bacon Bars


There are some foods that just naturally go together, like PB&J, chips & salsa, and beer & pretzels, to name a few. There are also some that, well... let's just say they've been tried and experimented with and in the end, should have been left alone. I'm not judging, as I have eaten my fair-share of unpopular foods and enjoyed them. But when it comes to experimenting, the one food I find that always seems to end up on top when mixed with other foods - unless you are vegan - is bacon. I'm talking about that trusty, salty, crispy, fat-drenched pork candy!  Can I get an Amen!

Now, all of my vegan readers will just have to pardon me for a second as I share this newest creation. It's quite simple, actually. I have a friend who had a birthday over the weekend and let's just say she is pretty obsessed with that pig candy.  She is also a lover of salted caramel and I wanted to bake her something special for her special day. With both of those in mind, I decided to try combining the two flavors.  I must say that I have been making these caramel bars from Averie Cooks more than my fair share in the last few months as people just go nuts over them.  I also like how easy they are to make. Adding the bacon seemed like a no-brainer... as well as a match made in heaven... I'm jus' sayin'!


Salted Caramel Bacon Bars
  
Makes one 13" x 9" pan of bars (Depending on your love of bacon and caramel)

1 1/2 Cups of Unsalted Butter (3 sticks) Cubed in 1 Tbs. increments
1 1/4 Cup of Powdered Sugar
3/4 Cup Granulated Sugar
1 1/2 Tbs of Vanilla Extract
3 Cups of Flour

3/4 Cup of caramel sauce (store bought ice cream topping is what I used)
1/2 lbs of crispy cooked bacon chopped in bits. (I used low sodium bacon)
1 Tsp. of Kosher Flaked Salt

Pre-heat oven to 350˚.  I baked the bacon first using this method, but kept the oven temp at 350.
While the bacon is cooking, place the butter and sugars and vanilla in your mixer fitted with a paddle. Mix until all are incorporated. Then scrape down the sides and add your flour. Mix again until dough pulls away from the sides of the bowl. Line your 13x9 in pan with parchment paper (I always do this to make sure the bars don't stick and get really good cutting results). Take 3/4 of your dough and pat it in the pan making sure it is flat and even throughout the pan.

~ Note: I will place another piece of parchment on top of the dough and use a glass or small roller to make sure the dough is completely flat and even. Then I remove the top parchment.

Before placing in the oven, use a fork and prick the top of the shortbread all over to prevent bubbles. Place in preheated oven and bake for 20 min. After the first baking, pull out and spread on top (evenly) your caramel sauce. Then sprinkle on your bacon bits. Lastly, sprinkle on the kosher salt. Then take your left-over dough and crumble little bits (dime size) all over the top and place the whole pan back in the oven for approx 20-30 minutes until all the shortbread crumbs on top are brown and golden. Cool an hour (I know, it's hard to wait!) before taking the whole parchment-lined bar out of the pan and cut into squares.

~ Note: after the bars come out and before you cut, you can drizzle more caramel on top.  I prefer not to as they are easier to handle. You have now been warned. These bars will go quickly and they will become your new best friend, or share and get yourself a whole new group of best friends.

Happy Birthday Suzanna!


Thursday, January 8, 2015

12 Days of Cookies

It's that time of year again, when holiday baking takes center stage. Whether you bake all year 'round or just for the holidays, you probably have an arsenal of your favorite "go-to" recipes. Personally, I prefer to mix up my traditional recipes with new ones, especially when there are people on my recipient list that have specific dietary restrictions.

Last year I was honored to be a part of Local Savour's 12 Days of Cookies blogger round-up. I'm equally honored to have been asked to take part again this year and submit one of my favorite cookies. I have several friends on my cookie list that are gluten intolerant so I thought I would share a couple of my favorite gluten free cookie recipes.

The first cookie, a Chocolate Orange Truffle, came from testing a number of gluten-free flour blends, with mostly frustrating results. I ended up trying it with no flour and that proved to be the winner. That was last year when I had only just started dabbling in the gluten-free world.

Now a year later I'm a bit braver and hopefully wiser when it comes to gluten-free baking - not to mention all of the additional options now available with gluten-free flours.  I was only asked to contribute one cookie for this year's round-up but I'm a girl of options so I'm throwing in my second favorite gluten-free cookie. Inspired by the ginger cookies from Starbucks, I came up with this gluten-free version. Whether you try one of the delicious choices from Local Savour or one from your own family recipe box, remember to take the time to enjoy your sweet success... I'm jus' sayin!


Chocolate Orange Truffle Cookies

3 cups powdered sugar
2/3 cup cocoa powder (I used Hershey's Special Dark cocoa)
1/4 tsp. kosher salt
3 egg whites (at room temperature)
1 tbs. of orange juice
2 tbs of orange zest
1 tbs. of vanilla
2 cups of chocolate chips

Preheat oven to 350°. Place parchment lined cookie sheet in freezer to chill.

In a large mixing bowl with a whisk, mix the sugar, cocoa and salt. With a wooden spoon, mix the egg whites, orange juice, zest and vanilla. When mixed well, stir in the chips and incorporate well. Place tablespoon sized mounds on baking sheet and bake 12-13 minutes until they have a nice sheen and hold there shape. Cool and enjoy with a glass of milk. No, really, you will need something to drink with these bad boys. They are decadent and rich. Oh, and gluten free! *Insert jazz hands here*


Gluten Free Spicy Ginger Cookies

2 1/4 cups of gluten-free flour (I use Namaste)
2 tsp. baking soda
1/4 tsp. salt
1 tsp. ground cinnamon
1 tsp. ground ginger
1/2 tsp. allspice
1/2 tsp. clove
3 tbs. of minced candied ginger
3/4 cups unsalted butter 
1 cup dark brown sugar
1 large egg
1/4 cup molasses
Granulated sugar for rolling

Heat oven to 375. Line 2 baking dishes with parchment paper.

Sift together the flour, baking soda , salt and dry spices. Set aside.

In a mixer cream together butter, sugar and molasses. Add egg. Slowly mix in the flour mixture and then the candied ginger. When all is incorporated, use a 1/4 cup measure to make dough scoops. Roll dough in granulated sugar. Place cookie dough ball on cookie sheet. Moisten your fingers with water and gently press down on top of sugared dough. Bake for 12 minutes (rotating at 7 minutes) until they have spread and are firm to touch. Remove from oven and allow to cool. 

Friday, September 12, 2014

Warm Cookies, Molasses Milk & Changes


For the first time in 24 years I find my mornings peaceful and sad at the same time. Peaceful because I'm no longer getting up at 6am, rushing to make breakfast and lunch for my kids. Sad because this has been a treasured chore that I have always taken pride in.  Making sure my kiddos started their mornings off with something yummy and making their lunches was fun for me, especially since they always looked forward to lunch and it being their favorite subject at school.

Now that my youngest is driving herself to school and has insisted she is old enough to take this "burden" chore off my hands, I find myself quite melancholy.  You could call it the start of "empty nest" syndrome, but I don't remember going through this when my son left home. Perhaps because when he left I still had a little one at home to care for (they are 8 1/2 years apart).  Either way, I now need to find other things to do in the morning before work. One thing that I can still do and as my family claims they will never get tired of, is coming home to homemade cookies.

Today as I was thinking of what to bake, I was reminded of my childhood and how much I loved those warm cookies my Mom would make on occasion after school. Sometimes she would serve them with molasses milk. I know what your thinking... "Ewww!" But hey, when you grow up with something it becomes a memory of comfort later in life. So today, as I'm feeling kind of blue, I'm going to remind myself that even though this is just another change of season in life, it can still be made sweet by memories... and cookies and milk.  I'm jus' sayin'!


Brickle Drop Cookies (as found on the back of Heath Bits of Brickle Bits bag)

*I added 1 cup of semi sweet chocolate chips to this recipe

Ingredients

1 cup (2 sticks) butter or margarine, softened
1 cup granulated sugar
1 cup packed light brown sugar
1 teaspoon vanilla extract
1/2 teaspoon salt
3 eggs
3-1/2 cups all-purpose flour
2 teaspoons baking soda
2 teaspoons cream of tartar
1-1/3 cups (8 oz. pkg.) HEATH BITS 'O BRICKLE Toffee Bits

Directions

1. Heat oven to 350°F. Lightly grease cookie sheet or line with parchment paper.
2. Beat butter, granulated sugar, brown sugar, vanilla and salt in large bowl until blended. Add eggs; beat well. Stir together flour, baking soda and cream of tartar; gradually add to butter mixture, beating until blended. Stir in toffee bits. Drop by heaping teaspoons onto prepared cookie sheet.
3. Bake 8 to 10 minutes or until lightly browned. Cool slightly; remove to wire rack. Cool completely. Makes about 6 dozen cookies.


Molasses Milk

For every 8 oz of milk (My Mom used whole milk but I am using almond milk now), stir in 1-2 Tbsp of good molasses.

You have to stir quite vigorously to get the sticky molasses to incorporate but that's half the fun. This is equally delicious served warm with a sprinkle of cinnamon.


Sunday, September 15, 2013

Is It Milk & Cookie Time?


September is here which means it's back to school and back to regular routines in this and so many other homes across America. Summer is fun with it's lazy days and schedules, however, Fall is and always will be the season I hold dear to my heart. This is the time that we start penciling in the lacrosse games, orchestra concerts, confirmation and all the other events we can squeeze into one school year. We are also dusting off the crockpot and getting back to planning dinners and baking comfort foods when time allows.

All of this planning and scheduling makes me think back to when I was a kid and the only thing I could think about after school was running home for a snack. I was fortunate that my Mom was a piano teacher so she worked from home. We had to be really quiet when we came in from school in case she was in the middle of a lesson, but we could always forage a snack for ourselves from the pantry. I was not involved in after-school sports or activities like my daughter is today. I had my snack while doing homework and if I got done quickly enough I might have time for 30 minutes of cartoons or get a life lesson in from watching the ABC after school specials. After that, I pretty much played outside till the dinner bell rang. I sometimes wish it was still as simple as I remember it, but the kids today seem to have so much more to keep them busy and because of that we tend to start looking for shortcuts where we can find them. I work part time from home which means on some days I have time to create snacks and dinners that are more labor intensive. But like many busy moms I sometimes have those days where I'm just happy when my kid grabs a protein bar and a bottle of water on her way to practice.

For the most part I always try to be an advocate for baking from scratch, however, I am also a realist and know that there is not always time to go that route. Today is one of those days. I wanted to have a snack for my daughter and her friends when they came home so I grabbed the box of cake mix that I keep in the pantry for emergencies and baked up some super quick double fudge cookies. They are quick and easy and at the end of a busy day for both of us, I'm just happy to see the smile it gives her and not whether or not I get the Betty Crocker Mom of the Year Award. However, if I used Betty Crocker Cake Mix, does that count?  I'm jus' sayin'!


Cake Mix Cookies 

1 box of your favorite flavored cake mix (I used Betty Crocker Chocolate Fudge)
1/2 Cup of Vegetable Oil
2 Eggs
1/2 Cup of Dark Chocolate Chips (you can omit these if you are using a different cake flavor)

Mix all of the above. Scoop onto parchment lined cookie sheets. Bake at 350ยบ for 9 minutes. Let cool and enjoy! Yep, that easy.  Feel free to experiment with different cake flavors and add-in's. I would love to hear about your favorites.

Sunday, July 14, 2013

Up On The Roof


"When this old world starts a getting me down, 
and people are just too much for me to face. 
I'll climb way up to the top of the stairs 
and all my cares just drift right into space."
~James Taylor

No matter who we are, there are days that even the most cheerful and upbeat of us get overwhelmed by what life throws our way. Most days, it's the trivial and meaningless that seem to hit us when we are vulnerable. But it's the days that bring heartbreaking news from family and friends that really hit home and personally, leave me completely without words. It's days like this that make me want to simply roll up into a ball and scream "WHY?" through my tears.

 For me, June and July have been a string of those days, one after the other, but instead of listing the deaths, life-threatening diagnoses and ongoing political issues, I'm going to go "up to the roof". Or in my case, instead of the roof, I'm going into the kitchen. Please don't misunderstand – cooking and baking does not take the place of a family member or change a piece of bad news. For me, it's a therapeutic outlet. Sometimes it's just a matter of re-directing my thoughts into a recipe. Or preparing a special treat for the person that is hurting, where the food becomes a catalyst for compassion and empathy when I have no words. I have handled stress and sadness in this manner my whole life. When you think about it, it's actually the way many things are handled. Why do you think we have the term "stress eating"? This year, in changing my eating habits, I have learned that it's ok to bake and cook when I'm upset, so long as I don't drown my sorrows in a whole cheesecake.

"So when I come home feeling tired and beat, 
I'll go up where the air is fresh and sweet. 
I'll get far away from the hustling crowd 
and all the rat-race noise down in the street."

I'll find solace and strength in mixing, cutting and prepping food up on my roof in my kitchen. I'm jus' sayin'!

Here's an old cookie bar recipe. It's an old stand-by and surprisingly, a post-biopsy request from one of my dear friends. I'd like to believe that even just for a moment, when she bit into one of these sweet bars, a smile came across her face and she was taken away from her stress (even for just that one moment).


7 Layer Bars (adapted from this recipe)

I substituted Toffee bits for the butterscotch bits. I did not add nuts (as the receiver does not care for nuts). I also added 1/2 cup of white chocolate chips to this batch. That's the beauty of this recipe - it's flexible so you can mix and match to your heart's desire.

Wednesday, December 5, 2012

Sweet Lemon I'm in love.


I was just recently asked to guest blog on a lovely blogger friend's site. It's always such an honor to be asked to do this. Elizabeth is one of those absolutely amazing ladies who you would definitely like to have over for tea. In fact, I hope this year to spend more time getting to know her even more. If you get a chance, go check out her blog LocalSavour and read her 12 Days of Christmas Cookies series. Each cookie is as unique as the guest bloggers that are sharing. Below is my submission.


During the holidays my daughter and I love to sip tea. It’s always been a favorite pastime and when it’s super crazy during the holidays, tea is the perfect thing to slow us down and allow us to savor all of the holiday joy instead of pulling our hair out trying to get to the next event. Of course, this experience is more than just enjoying a pot of hot tea. There are also the wonderful treats that tend to be served with it. One of my favorites is shortbread, which is also always on our Christmas cookie list. Its delicate crunch and slightly sweet flavor is perfect for gift giving, cookie swaps, Santa’s plate or a hot steaming cup of tea. Another treat in our house, or I should say in our garden this time of year, is fruit from our bountiful Meyer lemon tree. Most of the lemons are set a side for the traditional limoncello that we make every year. However, our tree is usually quite plentiful so we have enough for many other lemon treats. This shortbread highlights the Meyer lemon without being too sweet or too tart. The lavender is a pleasant surprise that brings perfect balance. After all, isn’t balance what we are all trying to achieve this time of year? I’m jus’ sayin’!


Meyer Lemon Shortbread with a Meyer Lemon Lavender Drizzle

•   1 ½ Cups of Butter
•   1 Cup of Coconut Sugar
•   3 Tbsp of Fresh Meyer Lemon Juice
•   The Zest of 1 Meyer Lemon (about 1 Tbsp)
•   3 ½ Cups of Flour
•   ¼ Tsp of Kosher Salt

Mix the Butter and the sugar together until combined. Add the zest, juice, flour and salt. Beat until combined. Dough should be able to pull together to make 2 balls of dough. Flatten each ball into a disk and wrap in plastic wrap. Chill 1 hour.

Preheat oven to 350.

Roll one disk out to ¼ of an inch thick. Cut into desired shapes. I did rectangles and triangles. You could also use a cookie cutter. Place each cookie onto a parchment-lined cookie sheet. Allow room between each cookie. Prick with a fork a couple times on top of each cookie to allow even rising. Bake 10-12 minutes (depending on your oven). Watch the edges and remove from oven when golden. Do not over-brown your shortbread. Cool on a rack.

Drizzle Lemon Glaze on top of cookie, then sprinkle edible lavender on top before glaze sets.

Meyer Lemon Glaze
In a small bowl, combine the following (except for the Lavender)
1 Cup of Icing Sugar (Powdered Sugar)
3 Tbsp of Fresh Meyer Lemon Juice
1 Tbsp of Meyer Lemon Zest
2 Tbsp of Culinary (Edible) Lavender for Garnish

Stir like crazy. If it seems like there’s not enough juice, keep stirring - it will come together. When it is a thick drizzle, you can spread on cooled shortbread. Or fill a small zip-lock bag, snip the corner and pipe a drizzle on top of each cookie.

Sunday, August 5, 2012

Tally Ho, Y'all


Well Tally Ho and Howdy! The Summer Olympics are now well underway and if you have been rushing around trying to get your British flare on, may I suggest you slow down for a few moments to enjoy a bit of tea. Tea has always been my all-time favorite time passer. Growing up, my mother used to let us kids dress up in her old clothes and wigs (yes, I went there) and then help us put together tea parties. She would always be able to pull something out of the pantry to snack on and make us feel special by putting the tea in a pot and dressing up the table with linens and fancy plates (thanks Mom for fostering that). I remember having my first real grown-up tea while on my honeymoon at Chateau Lake Louise in the Canadian Rockies. That is where I also discovered my love for Crumpets!

In the years since, I have enjoyed high teas in fancy hotels and in people's homes. All of them have one thing in common - they make you feel special for taking the time to sit back and relax. As I was watching the Olympics this past week, I was thinking about how special it would be to have tea in the Royal Palace, let alone with the Royal Family. It occurred to me then that royalty or not, palace or not, taking the time to enjoy a spot of tea can make one feel royal, in a sense, especially when you can share the experience with someone and make them feel like a queen. So just like that I was in the kitchen getting that kettle blowing. Throw in some southern charm and before you know it I have tea fit to make anyone feel like they are a queen... even if it's just me. I'm jus' sayin'!

"You can never get a cup of tea large enough or a book long enough to suit me."

~ C.S. Lewis


Some quick tricks I have learned over the years...

~ You don't have to have matching china. Mixing and matching is fun and it brings more charm to the table.

~ You don't have to make everything from scratch. Fix a few items like a sandwich or a scone and then purchase cakes and cookies or visa versa.

~ Make a tea that is to your liking. Though many prefer a rich black tea, you most certainly can make an herbal remedy as well. With so many on the market, click here to find what's right for you.

~ Keep your sandwiches from drying out or getting too soggy by making a thin swipe of butter over your bread before you place your filling. This will create a barrier so that the filling does not soak through. To keep sandwiches moist, place a clean, damp linen over your plate of sandwiches in the fridge while waiting to serve. This will keep them from drying out. 

~ Remember the curds and jams. Lemon curd is extremely easy to make for your scones and the pay off will be all the compliments you receive. I found this easy recipe several years ago and it is my all-time favorite curd recipe. Don't forget to pull out those yummy jars of jams that you have been hoarding in the pantry. They go perfect on a scone or as a spread on a tea sandwich.

~ Enjoy the art of conversation when you invite someone to join you for tea. We get so used to communicting through social media that we sometimes forget to simply enjoy talking to a friend in person.  Here are some great conversation starters.

~ If you are sipping by yourself, always remember that this is a great opportunity to relax and reflect. Grab that journal or book and blow off the dust.

~ Most importantly, remember that the art of tea is to slowly sip and relax


Here is my Southern spin on an English Scone. Notice I make mine sweet whereas traditional scones are only sweetened with currents. I have added fresh peaches and some heavy cream because that's how we do it in the summer in the South.


Peaches & Cream Scones
(Adapted from Allrecipes)

Ingredients
2 cups all-purpose flour
1/3 cup sugar
1 teaspoon baking powder
1/4 teaspoon baking soda
1/2 teaspoon salt
8 tablespoons unsalted butter, frozen
1 medium sized peach, diced
1/3 cup sour cream
2 tablespoons of heavy cream (and a bit more for the tops)
1 large egg

Directions 
Adjust oven rack to lower-middle position and preheat oven to 400 degrees. In a medium bowl, mix flour, 1/3 cup sugar, baking powder, baking soda and salt. Grate butter into flour mixture on the large holes of a box grater. Use your fingers to work in butter (mixture should resemble coarse meal), then stir in peaches. In a small bowl, whisk sour cream and heavy cream and egg until smooth. Using a fork, stir sour cream mixture into flour mixture until large dough clumps form. Use your hands to press the dough against the bowl into a ball. The dough will be sticky in places and there may not seem to be enough liquid at first, but as you press, the dough will come together. Place dough on a lightly floured surface and pat into a 7 to 8-inch circle about 3/4-inch thick. Sprinkle with remaining 1 tsp. of sugar. Use a sharp knife to cut into 8 triangles, placing each on a cookie sheet (preferably lined with parchment paper), about 1 inch apart. Paint the tops with a thin brush stroke of cream. Sprinkle with a pinch of sugar. Bake until golden, about 15 to 17 minutes. Cool for 5 minutes and serve warm or at room temperature.

Adjust oven rack to lower-middle position and preheat oven to 400 degrees. In a medium bowl, mix flour, 1/3 cup sugar, baking powder, baking soda and salt. Grate butter into flour mixture on the large holes of a box grater; use your fingers to work in butter (mixture should resemble coarse meal), then stir in peaches.

In a small bowl, whisk sour cream and heavy cream and egg until smooth. Using a fork, stir sour cream mixture into flour mixture until large dough clumps form. Use your hands to press the dough against the bowl into a ball. (The dough will be sticky in places, and there may not seem to be enough liquid at first, but as you press, the dough will come together.)

Place on a lightly floured surface and pat into a 7- to 8-inch circle about 3/4-inch thick. Sprinkle with remaining 1 tsp. of sugar. Use a sharp knife to cut into 8 triangles; place on a cookie sheet (preferably lined with parchment paper), about 1 inch apart. Paint the tops with a thin brush stroke of cream. Sprinkle with a pinch of sugar. Bake until golden, about 15 to 17 minutes. Cool for 5 minutes and serve warm or at room temperature.


And just in case you would like to have a tea party, but are not in the mood to do it yourself? Check out this fabulous post/pod cast from Field & Feast this week where Cecilia Nasti interviews the lovely Sophie Parrott here in Austin. Sophie runs "The Marvelous Vintage Tea Party" and she is an expert when it comes to high tea.

Sunday, June 27, 2010

A Beautiful Day for a Southern Wedding


Last weekend, my family and I piled into the truck and took off to Bryan, Texas to attend a wedding. This roughly 2-hour road trip was an excellent way to trap our busy family in one place and have some fun conversations. As we were driving, I was reminiscing about the lovely bride and how her family had come into our lives. It's been 9 years since we left California and all of our family and friends to move to Austin, Texas. When we first moved here we literally knew not a soul. I had been praying that God would answer our needs and bring friends to my kids, especially our son who was leaving so many of his good buddies behind in California. So our first blessing was the family that moved in next door. I call this an absolute blessing because they had a son the same age as mine and they would be going to the same school together. Their lovely daughter (Janell, the bride) was the perfect babysitter for my daughter. Even though this family was only with us a few years - the Mom (Lisa) was a student at UT and was finishing law school - it was some of the best and most blessed filled years we've had. I have a handful of neighbors that I consider the best in the world - the ones you go to for more than just a cup of sugar.

We got to watch the bride grow from a sweet teen into a college student during our time as neighbors, but that was long enough to know this young lady was destined to be a woman after God's own heart. Seeing her at the wedding brought that full circle.

So many weddings, no matter how hot the day is, seem to be held outside in the lovely Texas heat. If this is your plan as well, be gracious on your guests and provide a fan so that they do not pass out and miss the ceremony. The fans at this wedding had dual purposes. They provided a bit of breeze as well as having the details of the wedding printed right on them (clever right?). As a foodie, I am always interested to see and try the variety of foods that are provided at weddings. This was no exception and I must say the food was delicious. I particularly enjoyed the wedding favor which was a favorite of the bride. They were little Pan de Polvo cookies (made in Kingsville, TX) and placed in delicate boxes with the traditional ribbons on top. We all enjoyed them so much that I decided to come up with my own version on the ride home. Mine are more of a cross between a snickerdoodle and Mexican wedding cake. But the effect I was trying to go for was a cookie that tasted like a churro. My cookies are light and cinnamon-flaovored, and a bit different than the usual Mexican wedding cake cookies.

This wedding had all the elements that a Southern Wedding should, even down to the Groom's father being the Officiant. The bride and groom read their own vows and my favorite line from the Bride to the Groom was (I hope I got this correct) "Thank you for teaching me to cook without a recipe." That stood out in my mind because I am a firm believer that learning how to cook and enjoying it, is truly a gift of Love, and what better place is there to say it. I'm jus' sayin'!


Thank you Janell & John for letting us share in this blessed occasion!


Churro Drops


1/2 Cup unsalted butter
1/2 Cup butter flavored crisco
2 Tbs. agave syrup
2. Cup flour
1/2 Cup of chopped pistachios
1 tsp. vanilla
1/4 tsp salt
1 tsp. cinnamon

To roll the hot cookies in after baked: 2 Tbs. cinnamon mixed with 3/4 Cup sugar.

Preheat oven to 350`

Mix first 3 ingredients until combined and fluffy. Add the rest. Form 1 tsp. of dough into a ball and place on a parchment lined cookie sheet. Bake 14 minutes. Take out and toss gently into cinnamon sugar mixture. let cool on a rack. These are very delicate, so keep in an airtight container up to a week.

Tuesday, May 11, 2010

The Wooden Spoon


My Mom first received the "wooden spoon" as a wedding present, coming with a matching wooden fork and a large wooden salad bowl. The salad bowl only came out for special occasions and over a decade later, ended up as a garage sale item. As for the fork, we never quite put our finger on where that disappeared too. But the spoon... well that's a whole other story.

This spoon, if given an audience, could tell some kitchen stories that would put Mark Twain to shame. It could tell you how it stirred up coffee cakes with crumbled strudel on those "special" breakfast mornings. It helped my Daddy beat eggs, Bisquick and milk into some mighty-fine pancake suppers on Sunday nights. It can tell you how it occasionally lent its hand to child rearing when my brothers and I found ourselves acting out. I'd bet that it's seen more potlucks and stirred up more birthday cakes than Betty Crocker herself! I remember
using this spoon when I started baking. I also remember when I snuck it out of my Mom's kitchen and kept it in mine. I bake when I need peace and so that spoon has had a hand in grief, happiness, stress and of course, comfort. It has burn marks on it and it's weathered at the ends, but it still continues to be a legacy in our kitchen. I have kept it intact and still use it whenever I need the "perfect" spoon to mix something up.

Like any good kitchen tool, if you find one that works then you stay with it instead of trying to upgrade it because it just feels right in the hand. I had hoped to hand this spoon down to my daughter as a third generation of cooking lore. However, as we were getting ready to take the picture with it that now sits at the top of this blog, my husband picked it up and for whatever cosmic reason, it broke in half. Naturally, I was just in shock! How could a spoon that lasted 50 years just break in half? How could it stand up to so many batters and not get lost at so many functions just break in the hands of - bless his heart - my husband? I thought to myself, "How can I write a blog about my Mother's spoon if it's broken?" Well, guess what... with a little wood glue, a clamp, and numerous apologies from my sweet man, it's back to being that lovely wooden spoon and you know what? That break will just add more character for my daughter, because after all, it's not the spoon but the love behind it. That spoon endured more love than any one kitchen tool I know and I am proud to pass that love down to her.

Happy Mothers Day to my Mom, who taught me about the love and peace I can find by picking up a wooden spoon and turning it into a piece of comfort for my family. And Hun, don't worry if the wood glue doesn't work - there's always duct tape and it comes in many colors... I'm jus' sayin'!


In honor of my mom, I am posting her all-time favorite cookie recipe. If I had to pick one cookie that reminded me of my childhood, it's this one. The whole house smells of goodness when you bake these little gems. It's still one of the only cookies my Mom bakes today. My daughter loves these cookies and after making them for this blog, I realized I don't bake them enough. Betty Crocker was certainly onto something with this rich and spicy cookie.


Molasses Crinkles (adapted from Betty Crocker)

3/4 cup shortening
1 cup packed brown sugar
1/4 cup mild-flavor molasses or full-flavor molasses
1 egg
2 1/4 cups Gold Medal® all-purpose flour
2 teaspoons baking soda
1 teaspoon ground cinnamon
1 teaspoon ground ginger
1/2 teaspoon ground cloves
1/4 teaspoon salt
Granulated sugar

1. Mix shortening, brown sugar, molasses and egg thoroughly in large bowl. Stir in remaining ingredients except granulated sugar. Cover and refrigerate at least 2 hours.

2. Heat oven to 375°F. Grease cookie sheet. Shape dough into 1 1/4-inch balls. Dip tops in granulated sugar. Place balls, sugared sides up, 3 inches apart on cookie sheet. Sprinkle each with 2 or 3 drops of water.

3. Bake 10 to 12 minutes or just until set but not hard. Remove from cookie sheet to wire rack.